1. Introduction
If you’re never come across Wiggle Stereoscopy before, you should go straight over to Jim Gasperini’s web site. I first came across his images via BoingBoing a couple of years ago, but was reminded of it the other day by a link on Blog-Fu.
The technique gives an illusion of 3D by showing two images in rapid alternation: one from a left eye, and one from a right-eye perspective. Essentially it is separating the two pictures in time instead of space as is normally the case. You don’t need to wear special glasses to see the effect, and the illusion of dimensionality can be quite striking.
All of the 3D wiggle images I’ve seen on the web have either been animated GIFs, or Flash movies. These techniques have some disadvantages, though: animated GIFs are limited to a 256-colour palette, and using GIF compression for photos can result in large file sizes. Also, you need special programs to produce animated GIFs and Flash movies–you can’t just use plain ol’ Microsoft Paint.
However, I have come up with a new technique for showing wiggle stereograms on web pages, using only standard JPEG images, and a little sprinkling of Javascript. Using JPEGs gets around all of the limitations noted above, although it does introduce a few of its own. See for yourself if you think it’s worthwhile.
2. Wiggle it…with Javascript
The first step is to obtain a stereoscopic pair of photographs: two pictures of the same subject, taken a couple of inches apart. (I’ll describe how to make such a pair of photos with an ordinary digital camera in section 3.)
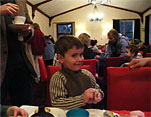
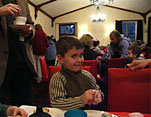
Next, using any graphics program you like, stitch these two pictures together side-by-side in a composite image of the same height, but exactly twice as wide as the originals. Then save this as a JPEG file.
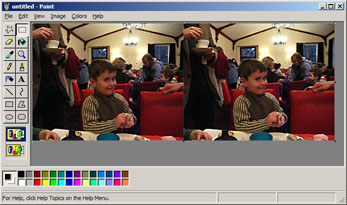
In your web page, reference the composite image as you would any other picture, but give it a class attribute of “wiggle”:
<img src="http://www.sunpig.com/martin/images/2005/12/wiggle-alex-composite.jpg" class="wiggle" alt="Alex stereogram" />Next, download the script file wiggle.js (version 1.2), and reference it in the head of your web page:
<head>
<title>Wiggly example<title>
<link rel="stylesheet" type="text/css" href="css/styles-site.css" />
...
<script language="javascript" type="text/javascript" src="js/wiggle.js"><script>
</head>
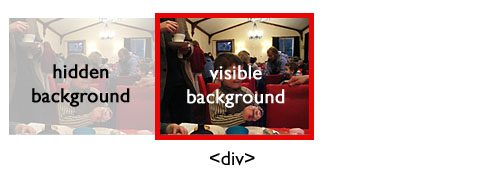
When executed, the wiggle script runs through the web page looking for images with the “wiggle” class. If it finds any, it replaces each one with a <div> element that is exactly half as wide as the composite image. It then uses the composite image as the background image for the <div>, so that you only see one half:

To perform the animation, the script simply switches the position of the background image every 120 milliseconds so that the visible part becomes hidden, and vice versa. (I chose 120 milliseconds because watching the effect at this speed felt right to me. There is no special significance to this frequency.)
Assuming you have Javascript enabled in your browser, the finished product looks like this:
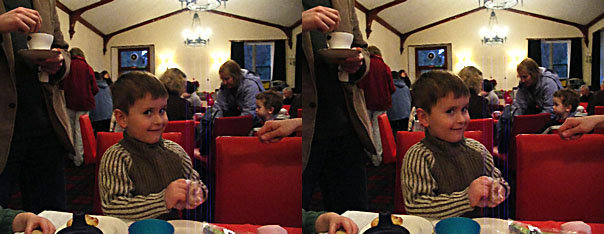
Update (27 Dec 2005): Because of some problems with how Internet Explorer deals with background images, I have changed the underlying code slightly. Using the script is still just a matter of dropping it into your HTML page as described above, though. The new version (1.2) is available here.
The advantages of this method over using animated GIFs or Flash movies are:
- No additional software required. Any image program that produces JPEGs will do.
- You can use a full colour palette.
- The file size will generally be smaller than the equivalent animated GIF. How much smaller depends on the compression settings you apply to the composite JPEG.
The disadvantages are:
- It is Javascript-dependent. Without Javascript, you will just see the composite image, not the animation. This means that you won’t see the animation show up in any RSS feeds. Also, although I’ve tested it on modern versions of Firefox, IE, Opera, and Safari, the script will inevitably be incompatible with some browsers.
- If there are lots of animations on the page, of if your browser is taking up a lot of memory and/or CPU time doing other things, the animation may judder.
- Depending on your connection speed, you may see the composite images before the script kicks in and converts them to animations. There are ways around this, but for the benefit of simplicity, I’m presenting the wiggle script just the way it is.
Whether this trade-off is worth it, is up to you.
3. Some notes on taking stereoscopic pictures
It doesn’t take much hunting around on the web to find custom 3D camera solutions that you can either buy or build yourself. The traditional cheap-ass, lo-fi alternative is to find a stable resting point, and move your camera a couple of inches between snaps. However, if you have a camera with a high-speed continuous shooting mode, you have yet another option: hold the shutter button down, and let the camera take a stream of pictures while you gently move sideways.
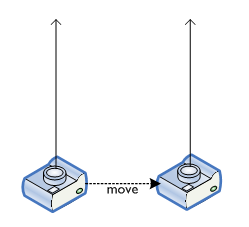
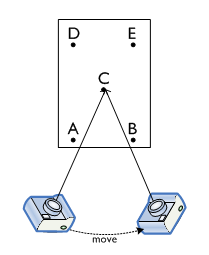
Better, though, is to move the camera in a slight arc, so that you keep a central point in focus:
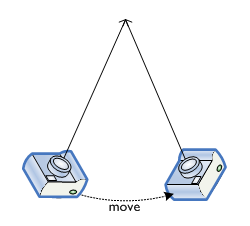
In ultra-high-speed continuous shooting mode, our Konica Minolta A200 takes 10 frames per second at a resolution of 640 x 480 (for up to 4 seconds). This produces up to 39 pairs of images (more if you also consider non-adjacent pictures), and often some of them are suitable for using as stereoscopic pairs. It’s not a particularly reliable method, but it’s an option. It can be quite useful if you’re trying to photograph moving targets (e.g. children) that are likely to zip half-way around the room in the time it takes you to reposition your camera for a second shot.
Keeping the camera moving in a graceful horizontal curve with no vertical travel is the really hard part. I’ve found that I get a steadier stream of images if I put the camera strap around my neck, and hold the camera out with both hands until the strap is taut: this stabilises the camera by anchoring it to my body, rather than just relying on my shaky hands.
Whichever method you use for getting your stereoscopic pairs, here’s a tip for producing images with the most striking 3D effect with the Wiggle technique. Try to capture a scene with three layers: foreground, centre, and background.
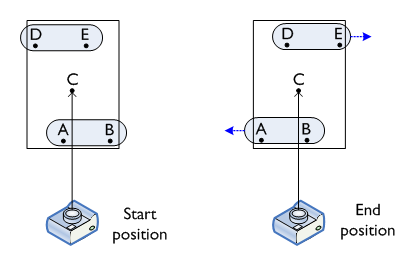
In the diagram below, points A and B are in the foreground, C is at the centre, and D and E are in the background.
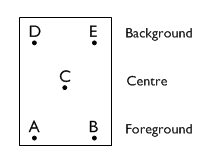
When taking your pictures, try to angle the camera so that the central point stays fixed at the centre of the image:
By keeping the central point fixed, the foreground and background points will be parallax-shifted in opposite directions: the background will appear to have moved from left to right, and the foreground will appear to have moved from right to left.
In the image below, the trees and fence are in the background, the white rose is in the foreground, and the dying fuchsia bush is at the central point:

Having the foreground and background move in opposite directions seems to be key to the visual effect: your brain somehow perceives this as “correct”, and compensates appropriately for the lack of real dimensionality. Also, an object at the central point provides an “anchor” for the entire image. Stereoscopic pairs where the central point is unoccupied (even though, geometrically, it is still present in the picture) don’t seem to be quite as vivid.
4. Wrapping it up
I’ve had great fun playing with this technique over the weekend. I hope I’ve shown that producing this neato 3D effect can be done with nothing more than a digital camera and the basic graphics programs that are (most likely) built in to your computer’s operating system. If you decide to play about with it yourself, leave a comment below so I can come and have a look at your pictures!
