I often get depressed about the fact that, on average, I read less than a book a week. That’s less than 52 books a year! Compared to the thousands of new books published each year, and hundreds of thousands more already in or out of print, 52 seems like a vanishingly small number. I feel like I have to make those 52 count.
Around this time last year I decided to do a “reading list” in my sidebar. Originally, it was just going to be a simple way for me to keep track of the books I’d read. I’d be able to browse through the list at the end of the year, and maybe compile a list of favourites. Friends and family who read my blog could also see the list and find out what was catching my fancy. I’d seen various other bloggers with reading lists in their sidebars. With Movable Type as my blogging back-end, it would be fairly straightforward to set up “reading list” sidebar in the same way as some people do sidebar links.
But then I realised that I could do more with the format…. I could track films I’d seen as well. With a little more effort I could write a short paragraph about the book or film to remind me what I thought about it at the time. How about giving them ratings as well? And by hooking in to Amazon I could add images to the mini-reviews so that people could see a book’s cover, and hop over to Amazon to see what other people thought of it.
And so the “Quick Reviews” sidebar was born.
The rest of this article will explain how to use Movable Type to set up a “Quick Reviews” blog or sidebar of your own. This certainly isn’t the only way to do it, but it’s relatively simple and tidy. There are no extra CGI scripts to install, no new database tables to create in your MT installation, and no kooky javascript or PHP files to scatter around your templates.
Please don’t be put off by the length of the article. It’s long because the technique takes some time to explain. But if you’ve installed Movable Type, then you’re capable of setting up a reviews blog. I’ve also tried to explain why each step works the way it does, so that you’ll be better placed to do your own customizations afterwards.
Contents:
- Ingredients
- Step 1: Set up a new Blog
- Step 2: Create your categories
- Step 3: Edit your category attributes
- Step 4: Edit your index template
- Step 5: (Optional) Linking to Amazon with pictures
- Step 6: Turning the reviews into a sidebar
- Step 7: Tweaking and customizing
- Final Notes
Ingredients
You will need:
- A Movable Type installation. I haven’t tested this technique for backwards compatibility, but I think anything after 2.2 should be fine. It doesn’t matter whether you use a SQL database, or the default Berkeley DB as our data store.
- Brad Choate’s Regex and Key Values plugins. Please see Brad’s pages for installation instructions.
- A set of images (gif, jpg, whatever) to flag the type of a review. For your convenience, I’ve packaged up the set that I use for download. It contains images for books, films, music, videgames, wine, and food. If you want more types, you’ll have to make them yourself. (Drop me an line if you create some pretty ones. I like pretty things.)
- A set of “stars” images to to indicate the rating you’ve given the item. (You can download the ones I use.)
- Optionally, an Amazon.com (or .co.uk) associates account. The Amazon associates programme allows you to download thumbnail images of books, DVDs, CDs, and other items for display on your own web pages, with the purpose of linking to those items on Amazon’s web site. Please read the operating agreement carefully, and DO NOT just download thumbnails at will, without signing up to the programme. Re-using Amazon thumbnail images without their permission is a BAD IDEA and could get you into trouble with their lawyers. The associates programme was set up precisely for this purpose, and it even allowes you to earn referrer fees.
Step 1: Set up a new Blog
This is where your reviews will reside. Each review is an entry in the blog. This tutorial will concentrate on building the main index template, and another index template that can be used for including the most recent reviews in a sidebar on another web page (your main blog). Setting up archives, RSS feeds, comments, etc. is just a matter of applying the ideas presented here to the rest of your templates. Set up your authors and permissions as you would on any other blog.
Step 2: Create your categories
For each type of item you plan to review (e.g., books, films, videogames), you will need to set up five Movable Type categories: one for each rating you can give the item. For example, if you are only going to be reviewing books, you’d create the categories:
- Books – 1 star
- Books – 2 stars
- Books – 3 stars
- Books – 4 stars
- Books – 5 stars
If you want to review films as well, you need to create another five categories for one star films, two star films, and so on.
If you to use a finer set of rating values, for example if you want to allow half-star ratings, you will need to create these extra ratings as additional categories. In my own Quick Reviews use ratings from 0 to 5 stars, in half-star increments, so I have 11 categories for each type of item I review. It’s up to you.
The significance of setting up your categories this way is that these are the category options you will see when you are creating a new review:
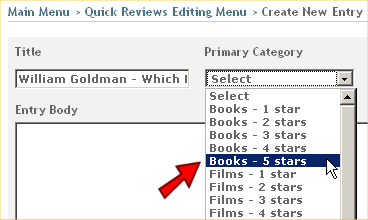
Fig 1: Selecting a primary category for your MT entry
Step 3: Edit your category attributes
This is a relatively little-used corner of Movable Type, but an enormously useful one. Each category you have created has space for a description. We’re going to abuse the simple “description” moniker and fill this field with lots of lovely metadata.
You get to the description field by clicking on the “Edit category attributes” link next to its name in the “Categories” screen:
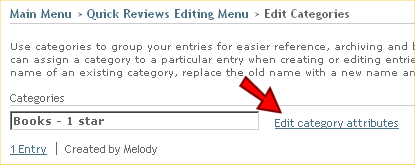
Fig 2: Edit the category attributes for your MT categories
Once you are on the category attributes section, here is the information you need to stuff into the category description field:
- A hyperlink to an image for the type of item the category refers to. For example, all five of the “Books” categories may have a link to a picture of a book.
- A description of the type of item the category refers to. For example, all five of the “Books” categories may have the description “Books”. Remember that the actual name of the category is “Books – 1 star”. This additional description effectively allows you to group categories. This description will also be used as ALT text on the category image.
- A hyperlink to an image of the number of stars the category has. For example, the “Books – 1 star” category will have a link to an image of one star. The “Books – 2 stars” category will have a link to an image of two stars, and so on.
- A text description of what this number of stars means. For example, a 1 star rating might be given the description “1 Star: Don’t waste your time on this piece of rubbish”. This description will be used as ALT text for the stars image.
You should enter these pieces of data in the format “Item=Data“. Each data item must start on a new line. By formatting the combined data in this way, we can later use the MTKeyValues plugin tag to extract each data item, and display it on our pages.
The items should be named as follows:
- CategoryImage
- CategoryDescription
- StarsImage
- StarsDescription
(Note that the names themselves are not relevant. We could call them “Item1”, “Item2”, “Item3”, and “Item4”, and it would still work, provided we use the same labels later on in the index templates. But it’s a good idea to give your labels meaningful names, so that if you come to change things around in a year’s time, you at least have some idea of what everything does.)
A typical Category Description should now look something like this:
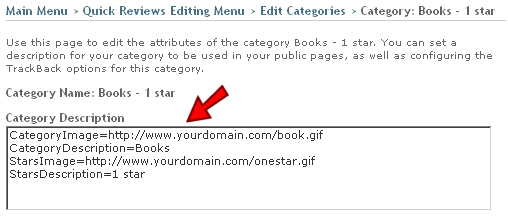
Fig 3: A typical category description
You will have to do this for every category you have created. (“Copy and Paste” is your friend.)
Step 4: Edit your index template
Now that we have spent so much time getting the category information into the system, here is how we get it all out again.
Just as a reminder, you must have installed the MTKeyValues and MTRegEx plugins, or else this next step will not work.
To extract the relevant category image from the category desription field, we can use the following chunk of template code:
I’ll run through this code from the inside out so you can see what’s happening.
At the core, there are two instances of the <MTKeyValue> tag. Each instance of this tag extracts a data item from the category description of the category for the current entry/review. The tag <MTKeyValue key="CategoryImage"> will look for the “CategoryImage” data item in our previously defined category description. It finds the value for this data item, and then displays this in the template. Likewise, the <MTKeyValue key="CategoryDescription"> tag looks up the “CategoryDescription” data item and grabs its value.
The output from this middle line would therefore look something like this:
The <MTKeyValue> tags sit inside an <MTKeyValues> container tag. By default, the <MTKeyValue> tag looks for its data items in the “additional entry text” field of a blog entry. However, we’ve placed out metadata in the “description” field of each category. We therefore have to tell the KeyValues plugin to grab our data from that location. Hence, <MTKeyValues source="[MTCategoryDescription]">.
(About that [MTCategoryDescription] thing…. The <MTCategoryDescription> is a template tag that grabs the category description field and displays whatever is in there. The unusual square brackets around the tag name are necessary because we have this tag embedded within another tag. That’s just the way it works.)
The final, outermost container tag is <MTEntryCategories>. This places our entire chunk of code in a Categories context. You must be careful here, because the <MTEntryCategories> container tag will iterate over all the categories an entry belongs to, and will run the code inside it once for every category. It is therefore very important that you do not assign multiple categories to your reviews. Otherwise you’ll get multiple category images and multiple ratings displayed. It’s not pretty.
The reason we have to place our <MTKeyValues> in an <MTEntryCategories> container in the first place is because Movable Type does not allow you access to the <MTCategoryDescription> tag from within an ordinary entry context. I find this a bit strange, but again, that’s just the way it works.
Using very similar template code, we can also extract the star rating for a given entry:
The output from this chunk of template code line will look something like this:
We can now sew these two chunks into the body of the default Movable Type index template:
Create a test entry in your reviews blog, assign it a category, and save it. Your index page should now look something like this:
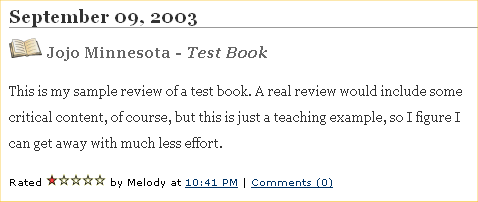
Fig 4: A sample review with category image and stars
Step 5: (Optional) Linking to Amazon with pictures!
(Important note: Remember that you need an Amazon associates account to do this. You can display a text link to Amazon without being a member of the programme, but in order to show a pretty picture of the item you’re reviewing, you need their permission to use their thumbnails. Alternatively, you could scan the items yourself and create your own thumbnail images. It’s up to you.)
You may have noticed that in addition to category images and stars, I also display other pictures next to some of my reviews. For books, I try to include a picture of the book’s cover. This is accomplished with the same technique. The difference is that the image applies to entry/review itself, not to the category it’s in. So we put the necessary metadata in the Keywords field of the entry.
Before we start messing with metadata, you’ll need to find a directory on your web server that will hold the thumbnail images of items you plan to review. The location of the directory is irrelevant, and you can create a new one if you need to. The important thing is that all your thumbnail images must end up here. They must have a consistent file path.
Right–back to keywords. By default, Movable Type doesn’t display the Keywords field on the entry screen. To show it, you have to go to the entry screen, and look for the “Customize the display of this page” link:

Fig 5a: Customize the display of the entry screen
Make sure that the “Custom” radio button is checked, and that there is a tick next to the Keywords option.
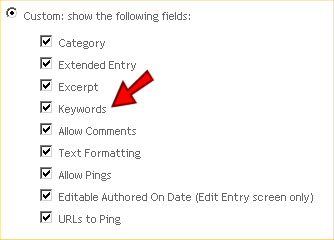
Fig 5b: Customize the display of the entry screen
When you get back to the Entry Edit screen, you will find a small “Keywords” text field below your main entry fields.
To display a link to a book (or a DVD, or a CD) on Amazon, you will need to find the Amazon ASIN code for the item. You can find this by going to Amazon and looking up the item in question. Once you arrive at the product page, look at the URL in the address bar of your browser. The ASIN code will be embedded in it:

Fig 5b: Finding an Amazon ASIN code
Take this ASIN, and then create a new keyword/value combination in the keywords section of your entry: “amazon=0345423348”

Fig 6: Placing the Amazon ASIN code in your keywords section
Next, you need to download a copy of the item’s thumbnail image from amazon, and place it in a thumbnails folder on your web server. Your web browser will suggest a name for saving the file as, but don’t use it. Instead, give it a name of “amazon_xxxxxxxxxx.jpg“, where xxxxxxxxxx is the ASIN of the item. In this example, the file name would be “amazon_0345423348.jpg” (You must ensure that your thumbnail images stick to a consistent naming scheme, otherwise your MT templates won’t be able to build links to them automatically.)
Finally, you need to add a new section to your index template to reference this image, and build the hyperlink to amazon:
As with the extra data we stuck in the category description field, we use the <MTKeyValue> tag to extract the value of a data item: in this case, it’s the Amazon ASIN code. The image that this template code generates will look like this:
The “legenofthesun-21” in the Amazon URL is my Amazon associates ID. You should replace this with your own associates ID, unless you desperately want me to be gaining referral fees from your web site.
Just like in the category metadata, we wrap the <MTKeyValue> tag in a <MTKeyValues> container tag, and tell it that our data is coming from a non-standard field: in this case, from MTEntryKeywords.
But what happens if you’re reviewing an item that isn’t featured on Amazon? Well, in that case, you just leave the Keywords field of your entry blank. In addition to the <MTKeyValues> container we also use a <MTIfKeyExists> container to wrap around the core link builder. This tag checks to see if there is an “amazon” data item present in the Keywords section. If there is, then it will build the appropriate link. If there isn’t, it won’t do anything.
Putting the whole thing together, you can now create an image-linked review in your reviews blog:
- Give it a title
- Select the category, which determined the type of item and rating you’re giving it
- Write the review
- Grab a thumbnail image from Amazon, and put it on your web server
- Place the Amazon ASIN in the keywords section
- Save the entry
If everything works as planned, your reviews blog home page should now display something like this:

Fig 7: A complete, image-linked review
Step 6: Turning the reviews into a sidebar
Once you’ve got the main index page for your reviews blog solid, you can then move on to displaying these reviews as a sidebar in a different blog on your web site. To do this, you need to create a new Index Template in your quick reviews blog. This new template won’t generate a whole web page, but instead just a chunk of HTML that you’ll embed in your other blog.
Call the template something like “Quick reviews for sidebar”, give it a filename of “index_sidebars.html”, and make sure that it is set to rebuild automatically:
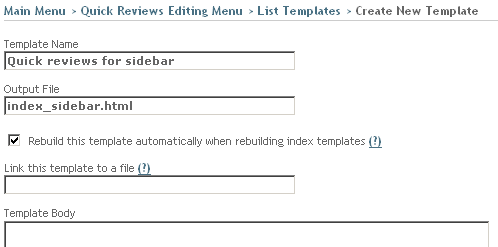
Fig 8: Create a new index template for sidebar reviews
Next, write a cut-down version of your main index template. You don’t need all the HTML page header stuff, or any of the javascript, styles, RDF information, etc. All you need is an <MTEntries> container to loop around the five (or more, or less) most recent reviews, and to generate sidebar HTML code for them. This would work:
You then need to use a Server-Side Include (SSI) to embed the output file in the sidebar of your main blog. (You also need to make sure that your web server supports SSI, but most do.) Go into your main blog’s index page, and add this little chunk to the sidebar part of the template:
Note that you will need to get the file path to this file exactly right, otherwise you’ll end up with “[an error occurred while processing this directive]” messages where your reviews should be. For more information on how to use SSI, there is some good information on the Apache project’s web site..
If all went well, then you should see your reviews now popping up in the sidebar of your main blog:
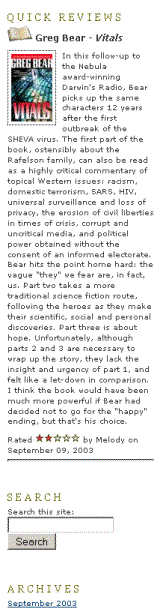
Fig 9: Your brand new sidebar reviews
Step 7: Tweaking and customizing
Once you have got the basics of a review blog, or a review sidebar set up, you can tweak it endlessly. The first obsvious target would be the styling of reviews on the page: borders around the reviews, colours, different images for the stars and categories, etc. You may also think about whether you want to allow comments from the sidebar, what to do about permalinks, whether to set up an RSS feed for your reviews, how to organize your category indexes, and so much more.
But I’ll leave all of this to your own imagination. If you do implement a reviews blog like this, I’d be delighted if you could leave a comment here, send me a trackback, or drop me an email (martin AT the obvious domain name). I’ve found these sidebar reviews to be great way for featuring extra content on my blog pages. I hope it will be of use to you, too.
Final Notes
Thanks to Rick Horowitz for pointing out a number of mistakes in the first version of this article.
Absolutely phenomenal! Five-plus stars! A must-read MovableType tutorial!
How might your tutorial work with TypePad?
Buzz
I’ve only played around with the Plus version of TypePad, and this method definitely will not work with that. Nor will it work with TypePad basic. I understand that TypePad Pro allows you to change your site’s templates yourself. However, this method of doing reviews also requires a couple of plugins to be installed, and I don’t think that TypePad allows you to add your own components the way MT does. So the only way this would work with TypePad is if it has its own equivalents of the MTRegex and MTKeyValues plugins. You might be best asking the TypePad people if this is the case.
This is a nice solution. Thanks for posting it. I’ve been wanting to extend my movie review system for a while now and this is definitely the way to go.
Great tutorial. I used most of the code to update my website’s review section. The only thing I changed is my logue is pulling out images from amazon.com directly. here is what i did:
replace:
<MTKeyValues source=”[MTEntryKeywords]”>
<MTIfKeyExists key=”amazon”>
<a href=”http://www.amazon.co.uk/exec/obidos/ASIN/<MTKeyValue key=”amazon”>/legenofthesun-21/ref=nosim/”><img align=”left” src=”http://www.yourdomain.com/reviews/images/amazon_<$MTKeyValue key=”amazon”>.jpg” /></a>
</MTIfKeyExists>
</MTKeyValues>
with:
<MTAmazon method=”Asin” search=”[MTEntryKeywords]”>
<a class=”img” href=”<MTAmazonLink>”> <img src=”<MTAmazonSmallImage>” align=”left” valign=”top” border=”2px”></a>
<a href=”<MTAmazonLink>”> <MTAmazonTitle></a> by <MTAmazonAuthor><br />
</MTAmazon>
At the same time, when I put KEYWORDS in the blog, I input only ASIN number instead of “amazon=[asin]”.
I guess this same sometime to download img and upload to our own server.
Thanks again, You did a great job.
hmm, the comment cannot display code. 🙁 sorry about that.
Comment edited to show HTML code properly… 🙂
Excellent article, and produces the results perfectly…even for a brand spanking new beginner like me!