S…l…o…w…

The more work I do inside Virtual Machines, the more I think my PC is coming ripe for an upgrade. An addional factor is the amount of Photoshop work I’ve been doing lately, including our annual photo albums.

For Christmas each year, Abi binds a set of albums, and we fill them with a selection of the best photos we’ve taken of Alex and Fiona. I don’t normally do much retouching of the images, but when Liza visited us earlier in the year, she enlightened me about the proper use of levels, curves, and colour balance. I’ve been practicing with these tools since then, and they are enormously useful. However, doing the photo albums is the first time I’ve used them for full-page, 600dpi print work. That means images of 6400 x 4100 pixels, and it doesn’t take too many of them to kill teh snappy.

So I’m pondering a few upgrades for Frankenstein:

  • AMD Athlon64 X2 (dual core) processor. Dual core is gooood. The 4400+ is the sensible choice, I think. The 4800+ is too expensive for too little added benefit. The 3800+ is cheaper, but given that the 4400+ has both a speed bump and twice the L2 cache, the cost difference is probably worth it.
  • Asus A8N-SLI SE motherboard. A new CPU means a new motherboard, unfortunately. This one supports all the features I need, and is reasonably priced.
  • 256Mb Gigabyte PCI-E Geforce 6600 with SilentPipe (GV-NX66256DP). A mid-range card, because I’m not overly concerned about gaming performance (although it should certainly be good enough for another year or so). However, a chunky integrated heat sink allows it to run without a fan. Another option would be the higher-spec 256Mb Asus PCI-E EN6600GT-Silencer, but I’m not sure if it’s worth it. Given how I use the PC, less money on the graphics setup means more money to go on the CPU.
  • 2GB DDR400 RAM. Lots of memory is gooood. 2GB would allow me to run several virtual machines at the same time.

Hmm. Next year…

Dynamically created (or included) Javascript

Dynamically created page elements? No problem. Dynamically created Javascript? As in, using document.createElement() to create a <script> element? Sounds like black magic, and it’s not something I would have tried myself until I saw the article @import voor JavaScript on Naar Voren (in Dutch). Basically, it’s a technique for giving Javascript the ability to include other script files “on demand,” much in the same way as PHP’s include() and include_once() functions.

This technique has actually been around for a while: a quick google showed me the article “Javascript includes – yet another way of RPC-ing”, by Stoyan Stefanov from July of this year, which in turn points back to articles from 2002. In addition to making the whole include() thing possible (a fantastically useful feature), using dynamically generated script also allows you to use make remote calls to other domains–something the HmlHttpRequest object forbids. In fact, Simon Willison was just talking about this the other day, in the context of Yahoo!’s web service APIs now providing output in JSON format as well as traditional XML.

It’s all coming together. A bundle of key techniques that have been around for ages (Unobtrusive javascript, object-oriented javascript, Ajax/remote scripting) have suddenly seen massive adoption and tremendous development. Javascript has matured a great deal over the course of 2005, and is rapidly tuning into one of the cornerstones of modern web development. It’s a very exciting time for the field.

Wiggle stereoscopy – a new approach

1. Introduction

If you’re never come across Wiggle Stereoscopy before, you should go straight over to Jim Gasperini’s web site. I first came across his images via BoingBoing a couple of years ago, but was reminded of it the other day by a link on Blog-Fu.

The technique gives an illusion of 3D by showing two images in rapid alternation: one from a left eye, and one from a right-eye perspective. Essentially it is separating the two pictures in time instead of space as is normally the case. You don’t need to wear special glasses to see the effect, and the illusion of dimensionality can be quite striking.

All of the 3D wiggle images I’ve seen on the web have either been animated GIFs, or Flash movies. These techniques have some disadvantages, though: animated GIFs are limited to a 256-colour palette, and using GIF compression for photos can result in large file sizes. Also, you need special programs to produce animated GIFs and Flash movies–you can’t just use plain ol’ Microsoft Paint.

However, I have come up with a new technique for showing wiggle stereograms on web pages, using only standard JPEG images, and a little sprinkling of Javascript. Using JPEGs gets around all of the limitations noted above, although it does introduce a few of its own. See for yourself if you think it’s worthwhile.

2. Wiggle it…with Javascript

The first step is to obtain a stereoscopic pair of photographs: two pictures of the same subject, taken a couple of inches apart. (I’ll describe how to make such a pair of photos with an ordinary digital camera in section 3.)

Alex image: right eye  Alex image: left eye

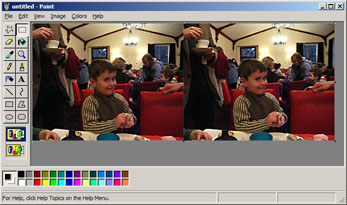
Next, using any graphics program you like, stitch these two pictures together side-by-side in a composite image of the same height, but exactly twice as wide as the originals. Then save this as a JPEG file.

Stitching two images together

In your web page, reference the composite image as you would any other picture, but give it a class attribute of “wiggle”:

<img src="http://www.sunpig.com/martin/images/2005/12/wiggle-alex-composite.jpg" class="wiggle" alt="Alex stereogram" />

Next, download the script file wiggle.js (version 1.2), and reference it in the head of your web page:

<head>
<title>Wiggly example<title>
<link rel="stylesheet" type="text/css" href="css/styles-site.css" />
...
<script language="javascript" type="text/javascript" src="js/wiggle.js"><script>
</head>

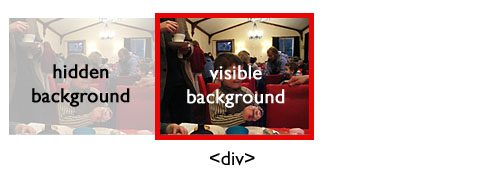
When executed, the wiggle script runs through the web page looking for images with the “wiggle” class. If it finds any, it replaces each one with a <div> element that is exactly half as wide as the composite image. It then uses the composite image as the background image for the <div>, so that you only see one half:

Replacing the composite image with a div

To perform the animation, the script simply switches the position of the background image every 120 milliseconds so that the visible part becomes hidden, and vice versa. (I chose 120 milliseconds because watching the effect at this speed felt right to me. There is no special significance to this frequency.)

Toggling the background image position

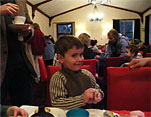
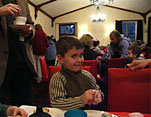
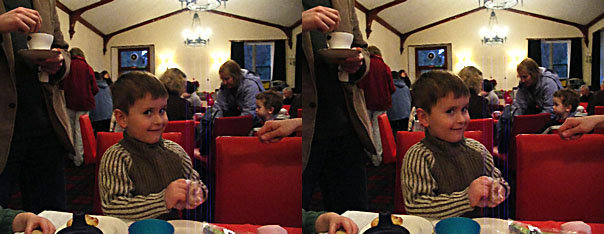
Assuming you have Javascript enabled in your browser, the finished product looks like this:

Alex in 3D!

Update (27 Dec 2005): Because of some problems with how Internet Explorer deals with background images, I have changed the underlying code slightly. Using the script is still just a matter of dropping it into your HTML page as described above, though. The new version (1.2) is available here.

The advantages of this method over using animated GIFs or Flash movies are:

  • No additional software required. Any image program that produces JPEGs will do.
  • You can use a full colour palette.
  • The file size will generally be smaller than the equivalent animated GIF. How much smaller depends on the compression settings you apply to the composite JPEG.

The disadvantages are:

  • It is Javascript-dependent. Without Javascript, you will just see the composite image, not the animation. This means that you won’t see the animation show up in any RSS feeds. Also, although I’ve tested it on modern versions of Firefox, IE, Opera, and Safari, the script will inevitably be incompatible with some browsers.
  • If there are lots of animations on the page, of if your browser is taking up a lot of memory and/or CPU time doing other things, the animation may judder.
  • Depending on your connection speed, you may see the composite images before the script kicks in and converts them to animations. There are ways around this, but for the benefit of simplicity, I’m presenting the wiggle script just the way it is.

Whether this trade-off is worth it, is up to you.

3. Some notes on taking stereoscopic pictures

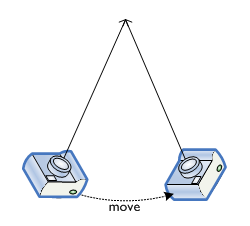
It doesn’t take much hunting around on the web to find custom 3D camera solutions that you can either buy or build yourself. The traditional cheap-ass, lo-fi alternative is to find a stable resting point, and move your camera a couple of inches between snaps. However, if you have a camera with a high-speed continuous shooting mode, you have yet another option: hold the shutter button down, and let the camera take a stream of pictures while you gently move sideways.

The sideways slide

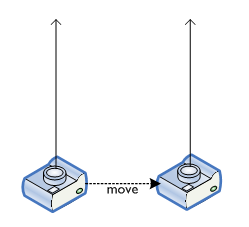
Better, though, is to move the camera in a slight arc, so that you keep a central point in focus:

The curved sideways slide

In ultra-high-speed continuous shooting mode, our Konica Minolta A200 takes 10 frames per second at a resolution of 640 x 480 (for up to 4 seconds). This produces up to 39 pairs of images (more if you also consider non-adjacent pictures), and often some of them are suitable for using as stereoscopic pairs. It’s not a particularly reliable method, but it’s an option. It can be quite useful if you’re trying to photograph moving targets (e.g. children) that are likely to zip half-way around the room in the time it takes you to reposition your camera for a second shot.

Keeping the camera moving in a graceful horizontal curve with no vertical travel is the really hard part. I’ve found that I get a steadier stream of images if I put the camera strap around my neck, and hold the camera out with both hands until the strap is taut: this stabilises the camera by anchoring it to my body, rather than just relying on my shaky hands.

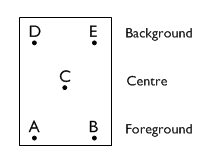
Whichever method you use for getting your stereoscopic pairs, here’s a tip for producing images with the most striking 3D effect with the Wiggle technique. Try to capture a scene with three layers: foreground, centre, and background.

In the diagram below, points A and B are in the foreground, C is at the centre, and D and E are in the background.

Capturing a scene: foreground, background, and centre

When taking your pictures, try to angle the camera so that the central point stays fixed at the centre of the image:

Capturing a scene: holding the centre fixed

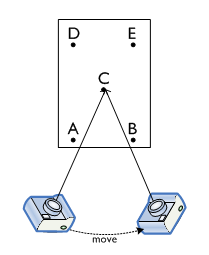
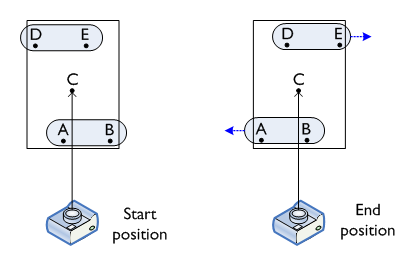
By keeping the central point fixed, the foreground and background points will be parallax-shifted in opposite directions: the background will appear to have moved from left to right, and the foreground will appear to have moved from right to left.

Capturing a scene: parallax effects

In the image below, the trees and fence are in the background, the white rose is in the foreground, and the dying fuchsia bush is at the central point:

Our back garden

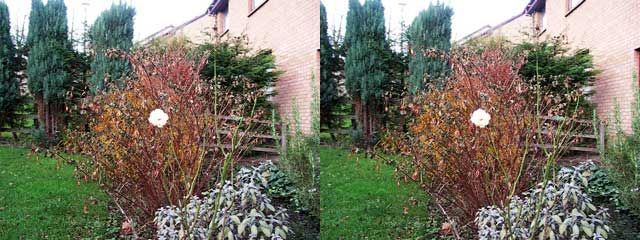
Having the foreground and background move in opposite directions seems to be key to the visual effect: your brain somehow perceives this as “correct”, and compensates appropriately for the lack of real dimensionality. Also, an object at the central point provides an “anchor” for the entire image. Stereoscopic pairs where the central point is unoccupied (even though, geometrically, it is still present in the picture) don’t seem to be quite as vivid.

4. Wrapping it up

I’ve had great fun playing with this technique over the weekend. I hope I’ve shown that producing this neato 3D effect can be done with nothing more than a digital camera and the basic graphics programs that are (most likely) built in to your computer’s operating system. If you decide to play about with it yourself, leave a comment below so I can come and have a look at your pictures!

Windows Forms applications: Just Say No

Of all the things I’ve learned this year, the most important is this: in a corporate/enterprise environment, you need to have a damn good reason for building a client-side forms application instead of a web app.

I reached this conclusion after building an in-house stock control system as a Windows forms app. Here’s how the architecture ended up:

Order system architecture: actual implementation

There’s nothing too controversial here, I’m sure you’ll agree. The most unusual thing is perhaps placing the burden of document generation (stock spreadsheets, production orders, invoices, etc.) on the client. The reason for this was cost and (supposed) simplicity: all the client machines using the application are equipped with MS Office, and so I could use Office automation to interact with a set of existing document templates. Buying a server-side component to generate Office documents (such as SoftArtisans OfficeWriter) seemed too expensive given the small size of the app, and creating a new set of templates in order to use a less expensive (or open source) PDF creator seemed too elaborate. (Don’t even get me started on working with WordML.)

In fact, document generation was the deciding factor in building a client-side app. In retrospect, this is probably the worst decision I made in 2005. The downsides were numerous:

Deployments

The obvious one has probably been the least painful. My experiences with .NET zero-touch deployments have been mixed at best. I’ve seen it working, and I’ve had it working myself, but the experience was awkward. Same with application updaters. Distributing a .msi setup package is simple and mostly foolproof, though. Nevertheless, it means the clients have to reinstall whenever a new version is available. If I had to do this again, I would choose one of the hands-off approaches, and work through the pain to get it up and running. Still if this were a web app, I wouldn’t have to deal with any of this.

Asynchronous communication

Easy enough in theory, but a bugger to get right in practice. The main idea is to keep the UI responsive while it is talking to the server by doing all the web service calls on a secondary thread. It was a lot of effort just to get progress bars working properly, and in the end I’m not entirely convinced it was worth it. As a UI specialist I am fully aware of the need for continuous feedback and a snappy feel, but for a small project like this I think it was overkill.

The .NET Datagrid component

Bane. Of. My. Life. Looks fine on paper, or in a demo, but COMPLETELY USELESS in any kind of real-world scenario. The amount of code you have to produce (either by writing it yourself, or by copying it from those who have suffered before you) to get even simple functionality working, like setting row heights, colouring the grid, or adding a drop-down list to a cell is staggering. If you want to do any serious client-side development with grids, you really must buy a third-party component.

In fact, the whole “rich user interface” benefit that has traditionally been the advantage of forms applications needs to be completely re-examined in the light of modern web apps, which draw upon javascript for better and more responsive interaction (Prototype, Script.aculo.us, Rico et al.), and CSS for visual flair. I can see a trend these days (in corporate environments) towards making client-side forms applications look and feel more like web pages, whereas just a few years ago it was the other way round.

Office automation with .NET

Not nearly as good as it should have been. Sure, I was able to re-use the existing templates to produce niceply formatted documents, but the Office API hasn’t improved significantly since 2000. Add to that the painful burning sensation of accessing it through COM Interop, and you get a whole heap of…yuckiness.

So with the benefit of hindsight, what should I have done instead? I’m glad you asked. Here’s the architecture for version 2:

Order system architecture: v2

The Forms UI is going away, and will be replaced by a clean HTML/CSS/JS front-end. The business logic, which was distributed between the client and the server will now be purely server-based. (There will still be a certain amount of client-side validation via the ASP.NET validator controls, but that will be controlled from server-side code.) It might include some Ajax further down the line, but the initial development will be a simple, traditional page-based web app.

And document generation? Version 2 will be using the OpenDocument (OpenOffice.org) format. This is an XML format that is an awful lot easier to get right than WordML, meaning that I can use simple XmlDocument-based code on the server to create documents. The client machines will get OpenOffice 2.0 installed, and upon clicking a “Print” button will receive a response with a Mime type of application/vnd.oasis.opendocument.text. The web browser can then pass it straight to OpenOffice for viewing and printing. OpenOffice has come a long way in the last few years, and version 2.0 is excellent. It happily converts Word templates to its own format, so I don’t even have to do much work in converting all the existing assets.

There is definitely still a need for client-side forms applications. If you want to make use of local hardware features, such as sound (e.g. audio recording), graphics (dynamic graphing and charting), and peripheral devices (barcode scanners), or if you want to have some kind of off-line functionality, you’re going to have to stick closely to the client. But for typical corporate/enterprise applications–staff directory, timesheets, CRM, and every bespoke data-entry package under the sun–I can see no compelling reason to consider a forms application as the default architecture.